
Tag Archives: BBB
I’ve run into a situation where I need to be able to read a temperature with my Beaglebone Black (I really don’t care about humidity). After setting up the sensor on my Rpi, a few have emailed me and asked about doing the same for a BBB, and I haven’t had much by way of response. The file that I previously used didn’t work on a BBB.
On the Beaglebone Black, there are a few preparation items that must be completed:
1: Make sure you have Internet connectivity (I had to add DNS servers to /etc/resolv.conf)
2: Go to Derek Molloy’s blog and follow step 3 under “Fixing SSL Problems with Curl”
3: Make sure Python and some Python tools are installed:
opkg install python

opkg install python-pip python-setuptools python-smbus python-misc
4: Install the Adafruit BBIO Python tools:
pip install Adafruit_BBIO
5: Follow LadyAda’s steps to install
At this point, you can connect the sensor, make sure to use SYS_5V (P9 7 or 8) and not VDD_5V.
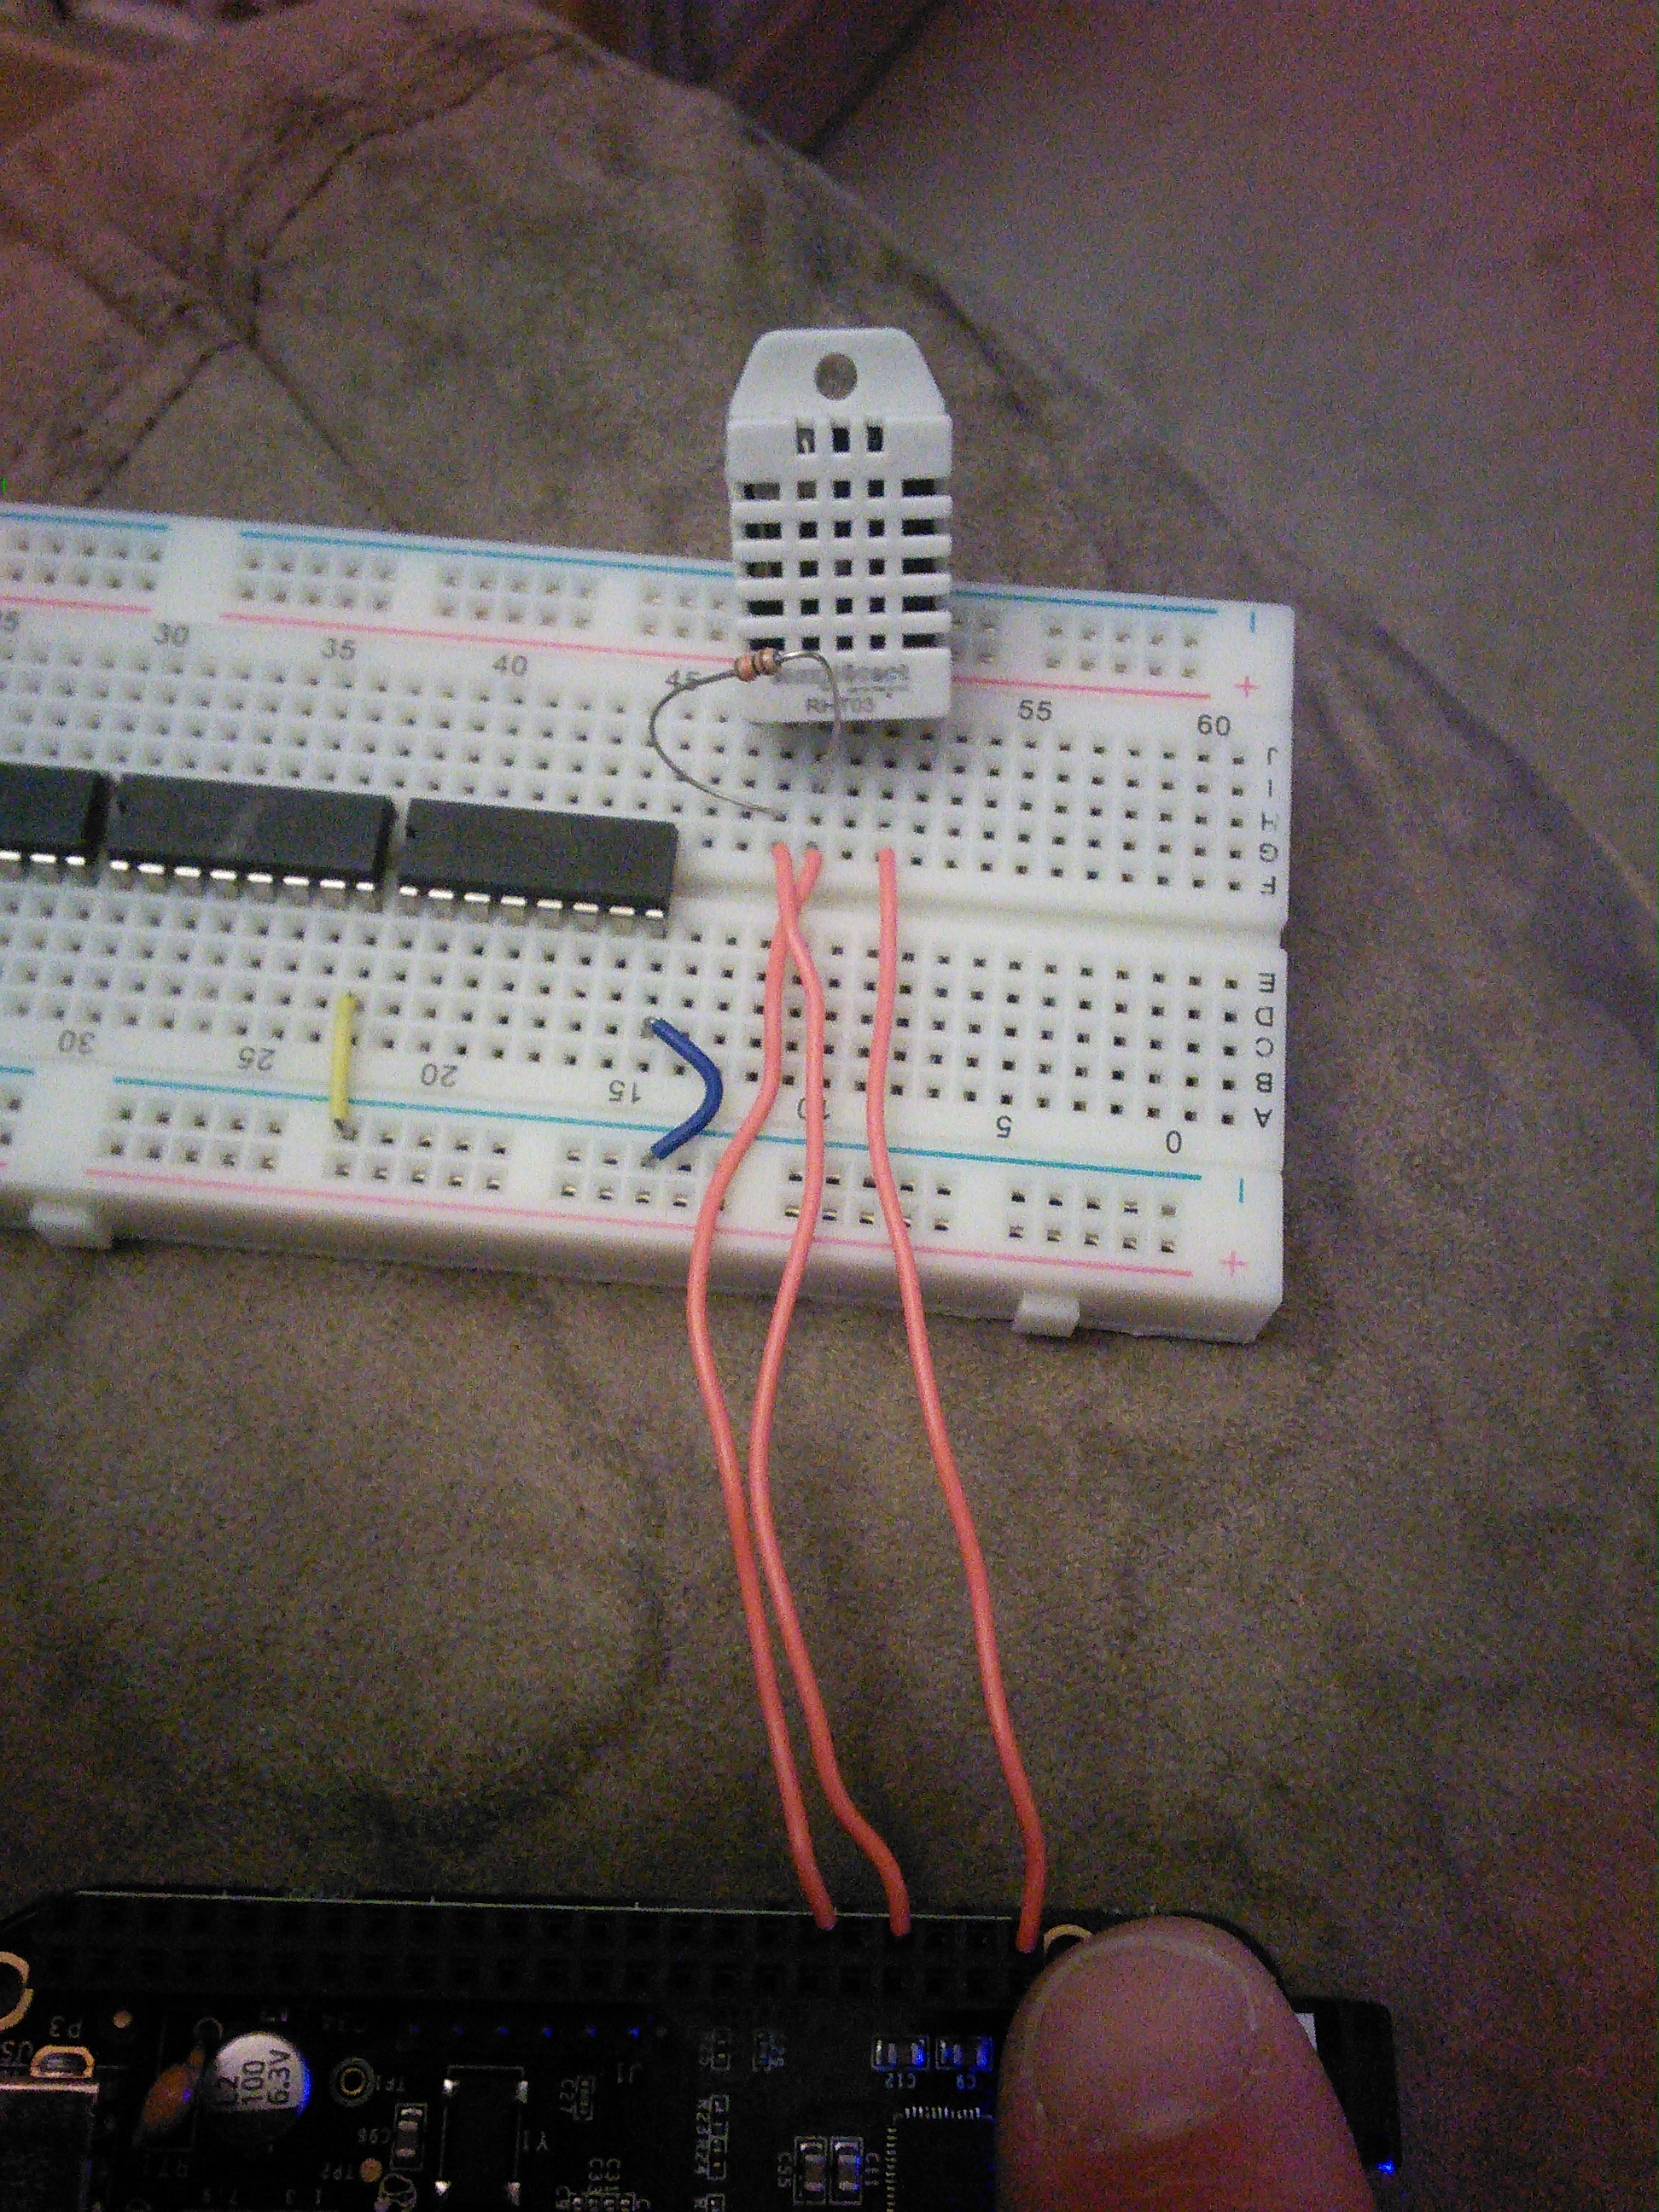
Pin 1 on the sensor is connected to P9_7, pin 2 has a 10K pullup resistor and is connected to P9_11, pin 3 is connected to P9_1.
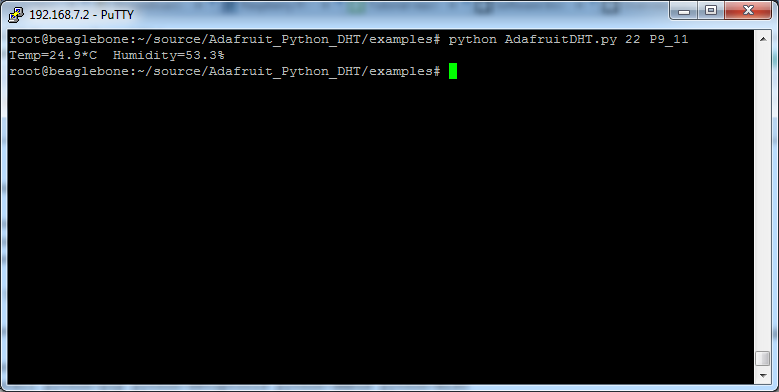
At this point, you can go into the examples and it should work… in Centigrade:
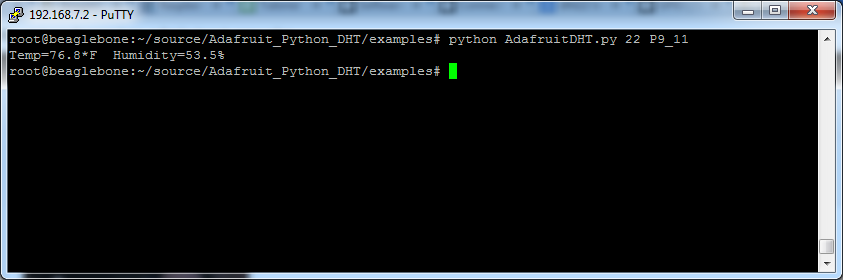
…which is great for those of you that use that standard, but in America we use Fahrenheit, which is a pretty simple code change that you can see in my fork on Github.
So now…
At this point, a mix of Python and Cron would make this able to send data to ThingSpeak, Xively, Phant, or any of the other IOT logging services (which may become a future blog post).
-73-
PS: for full disclosure, I’m looking at this because I’ve been brewing beer and I’d like to THINK my basement temperature is under control, but with temperatures possibly starting to fall in my area I’d like to keep a better eye on it. 🙂
In Part 1 of this, I went over the setup of ThingSpeak and several associated and almost-associated packages.
This part will be more about the funner stuff.
Rain Gauge Reader
The first thing I had to do was build a rain gauge reader. I ultimately started that before doing part one, but then moved on to a standalone node.js program that counted clicks from the rain gauge.
The rain gauge is a tipping-bucket rain gauge that tips when the rain gets to 0.2mm. The guts are in the picture below.
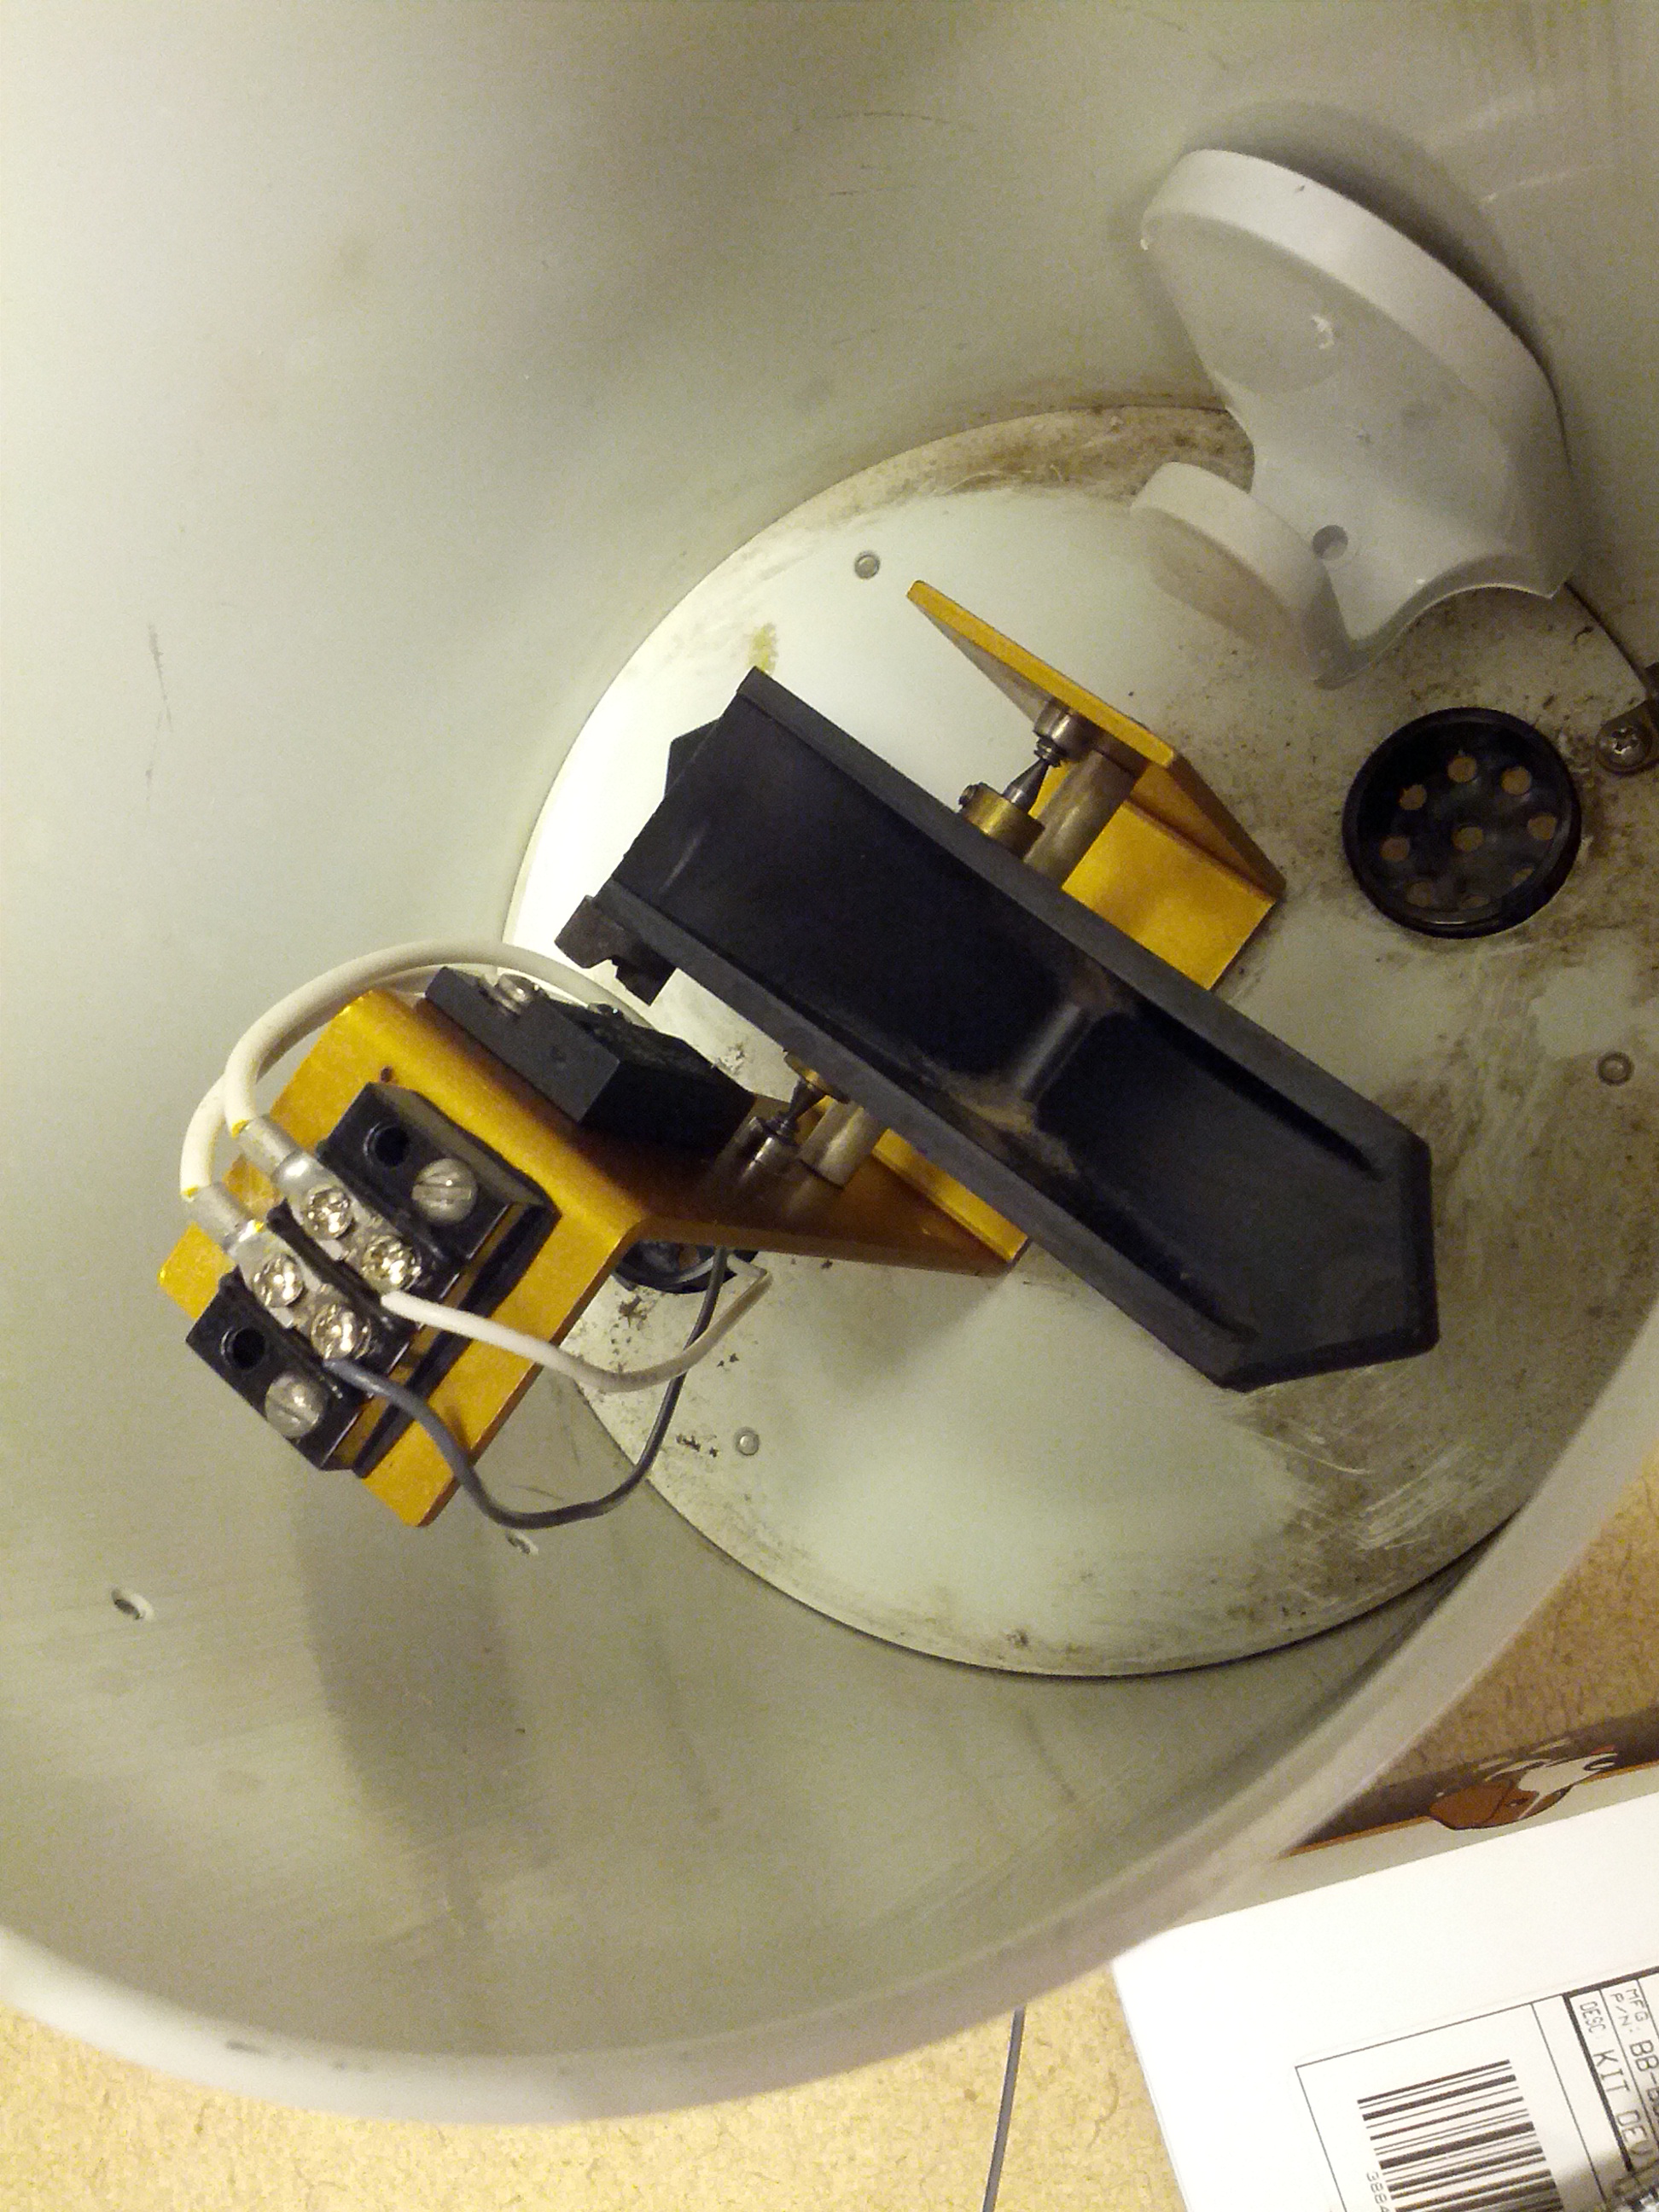
These are the guts of the rain gauge. You can see the tipping bucket (black) and the barrier terminal that connects to the switch. Yep, that’s all it is, a switch.
The rain gauge initially came with a little board that has a PIC and an EEPROM that stored clicks. I didn’t care for that idea, since the ultimate plan is to see if we can put this on our building’s roof with a battery and a solar panel.
This is where the BBB comes in. I connected the rain gauge to the BBB and started playing with node.js until I came up with the program in the gist below.
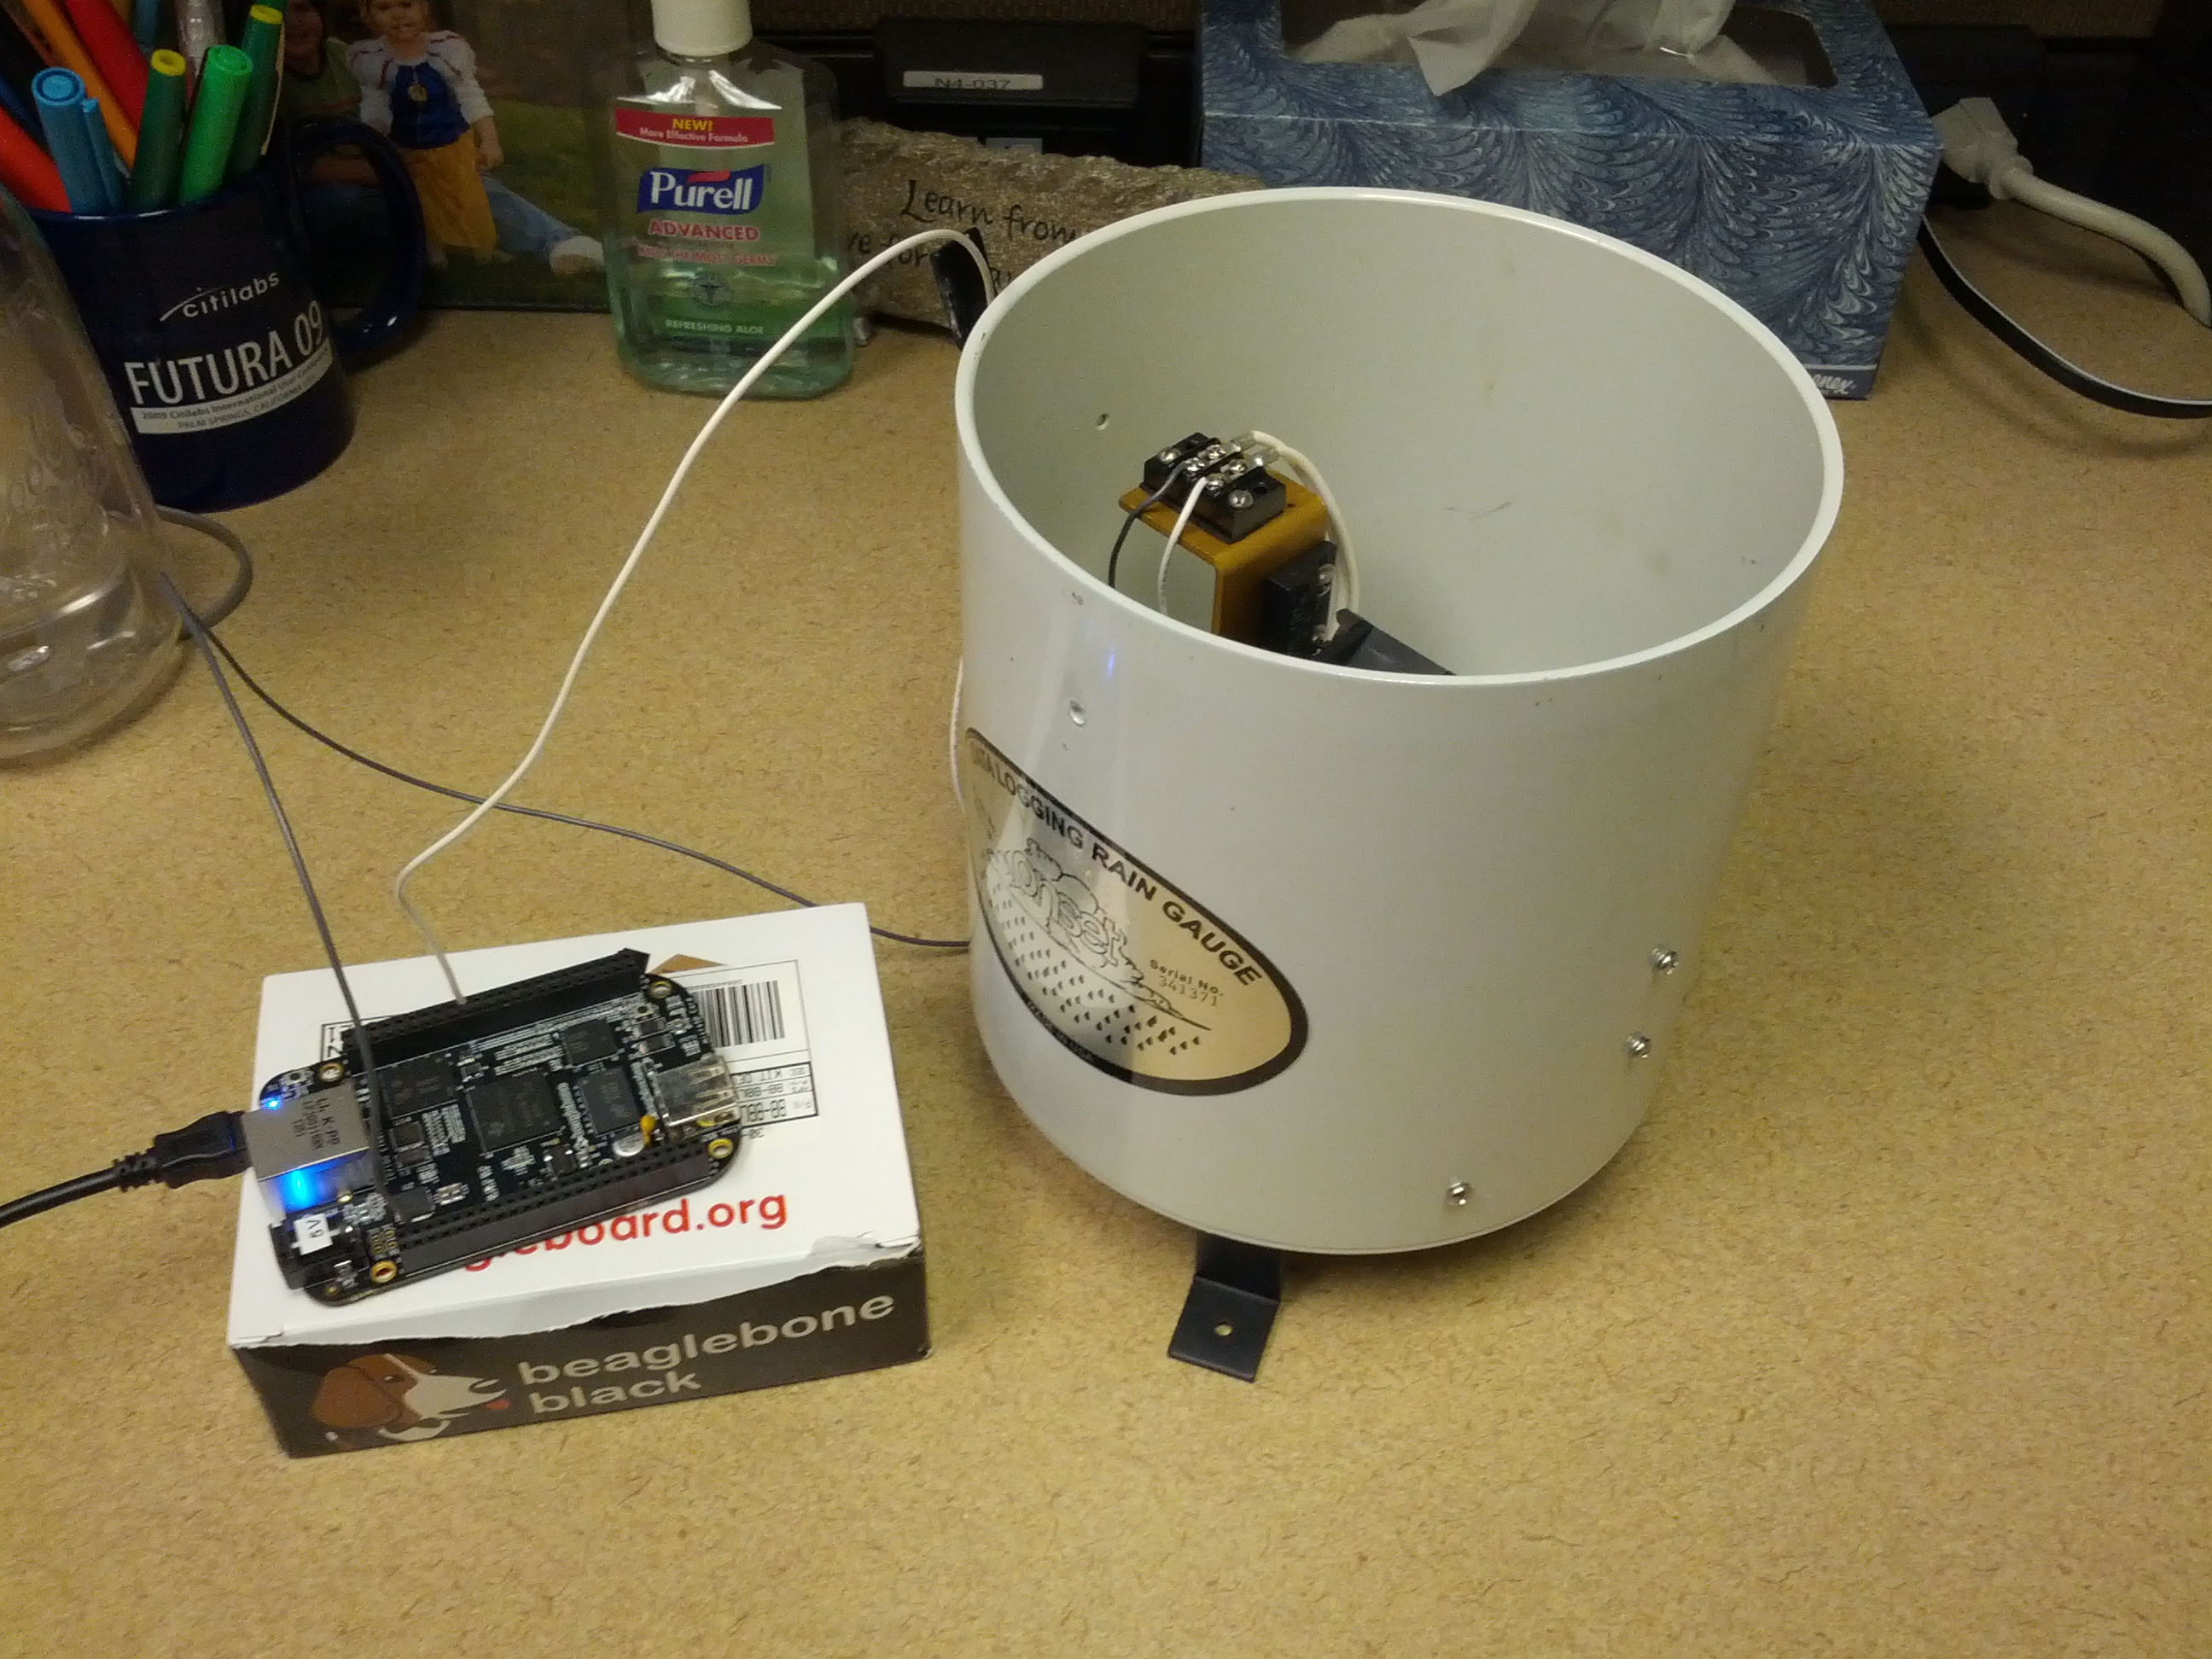
Beaglebone Black connected to the rain gauge. I routed the wires through the drain of the rain gauge, which may change when I actually put this in use.
After setting it up, it was time to test.
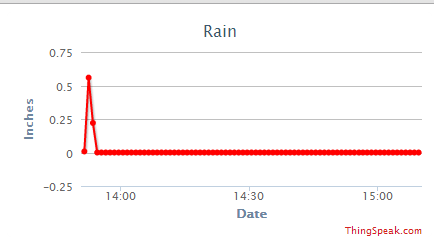
Wow, it rained for a half inch during a minute in my office!
The third part of this will be making this fault-tolerant: fixing the time issue (it doesn’t keep time), starting things during startup, and security.
-73-
Recently, a coworker brought a raingauge to me that was collecting dust somewhere in a storage room at the office. After making it work, I thought that I could certainly rebuild it. Better. Faster. With a much cooler interface.
I also thought that this might be a damn good opportunity for my BeagleBoard Black.
Setup
There are a few initial things that need to be done:
 ntpdate time.nist.gov

opkg update

opkg upgrade
These commands set the date and time, update the available package listing, and upgrade all installed packages to the latest version.
The next thing I did was edit /lib/systemd/system/bonescript.socket and change the listening port to 8080. This will break the connection between the board and the website (so you can’t click the buttons on some of the programming example pages and make the LEDs blink… which I admit is a pretty cool feature). Cloud9 will still remain on port #3000. More on that later.
Additionally, I changed /usr/lib/node_modules/bonescript/server.js to port 8080. This was really to try and maintain the connection between the board hardware and the website. It didn’t work, but I wanted things off of port 80 so port 80 could be used for a website.
After all this I rebooted the board.
When it came back up, I lost internet access to the board, so I edited /etc/resolv.conf to add the local DNS server in my office.
After that, I ran several installs:
opkg install mysql5

opkg install lighttpd

opkg install php php-cgi php-cli

opkg install lighttpd-module-fastcgi
Next, I edited the lighttpd config files per this blog post. Once those were edited, I restarted lighttpd and brought up my version of index.php (which included the phpinfo() command to show me that PHP was working).
Ruby & ThingSpeak Installation
I installed Ruby and got the Thingspeak source from GitHub (I created some folders for this, I’m assuming if you’ve made it down here you can figure that part out):
opkg install ruby ruby-dev

git clone git@github.com:iobridge/thingspeak.git

gem install bundle
Then I went to the GitHub project page to follow the instructions to install ThingSpeak. I ran into several problems. One of them related to a file not being able to find assert.h. I fixed this by setting the C_INCLUDE_PATH variable:
export C_INCLUDE_PATH=/usr/include
The next problem wasn’t so easy. The linker was having a problem finding one the libgcc_s library. I ultimately fixed this by linking /usr/lib/libgcc_s.so to /lib/libgcc_s.so.1:
ln -s /lib/libgcc_s.so.1 /usr/lib/libgcc_s.so
Then, I started getting “Command not found” for /usr/bin/mkdir. That was sort of a “WTF?” moment, considering I created a folder for the ThingSpeak source earlier. I figured it must be hard-coded to use /usr/bin and the mkdir command was in /bin. More symbolic links:
ln -s /bin/mkdir /usr/bin/mkdir
Once these symbolic links were in place, I was able to get further in the “bundle install” process, only stopping thrice for the following missing items:
opkg install libmysqlclient-r-dev

opkg install libxml2-dev

opkg install libxslt-dev
After these three items are installed, I could bring up ThingSpeak by running:
rails server -d -p 3001
And bringing up http://localhost:3001
In the next post, I’m going to get into the rest of what I was doing.
-73-
I’ve been playing around with my BeagleBone Black quite a bit recently. It all started with one of my coworkers bringing in a rain gauge that we had collecting dust somewhere in an office storage room. I had been installing software to the BBB and ran out of space on the eMMC (internal memory) chip. So I tried to boot from an SD Card – the one I updated the BBB to the latest software with and still loaded with the image. It appeared to me that it maybe had been reloading the eMMC, but I couldn’t tell for sure. After around a half hour, I power-cycled the BBB. Bad news, it wouldn’t boot. I don’t have the correct HDMI cable, and I’m at work, so my resources are pretty limited.
Enter the FTDI port on the BBB. Enter the fact that I don’t have an FTDI cable at the office. D’oh!
But I have a few Arduino Unos.
I wondered, and then quickly looked on the Internet to find a page on Instructables that describes how to use an Arduino as an FTDI programmer. I then looked at a reference for the pinouts. A page at Circuitco has the pinouts that seemed like they’d work – ground, RX, and TX. I hooked them up and…
It gets a little bit more MacGyver-ish. I have only a small box of jumper wires at the office, a few shield headers, and a breadboard…
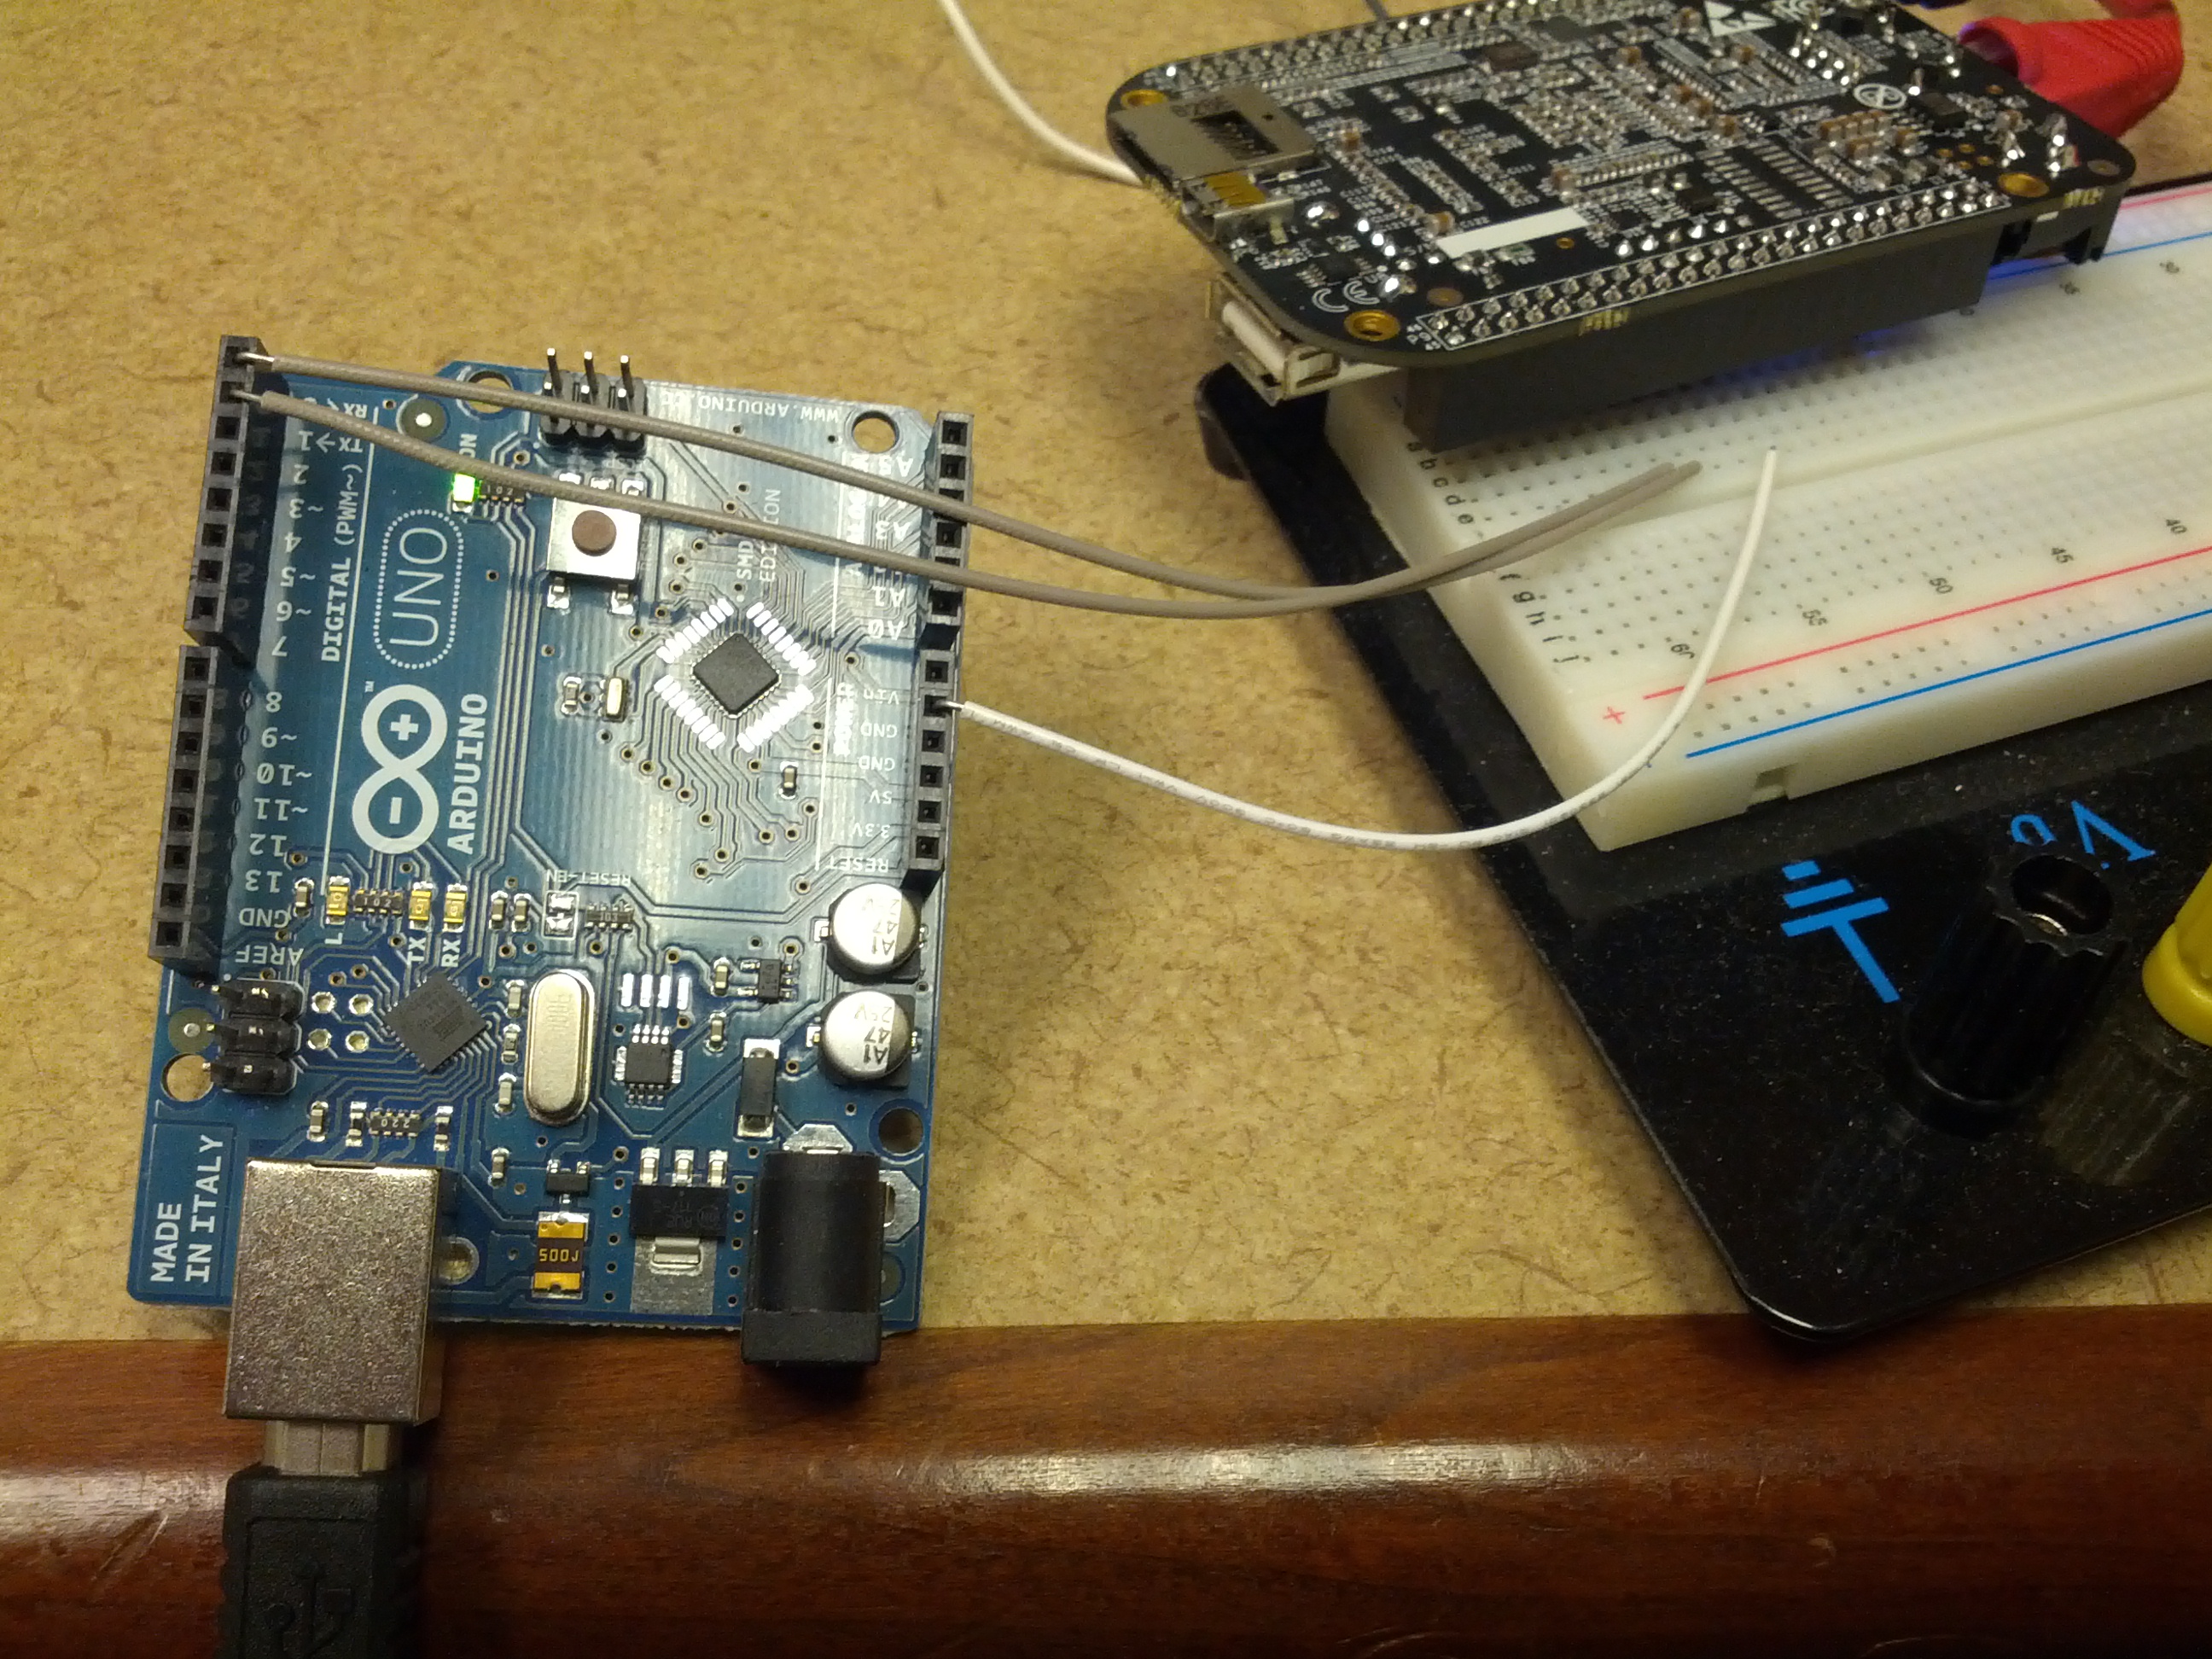
This is an overview of the setup. The Arduino RX, TX, and Ground are connected to a breadboard that has a shield header that connects to the BBB’s FTDI port.
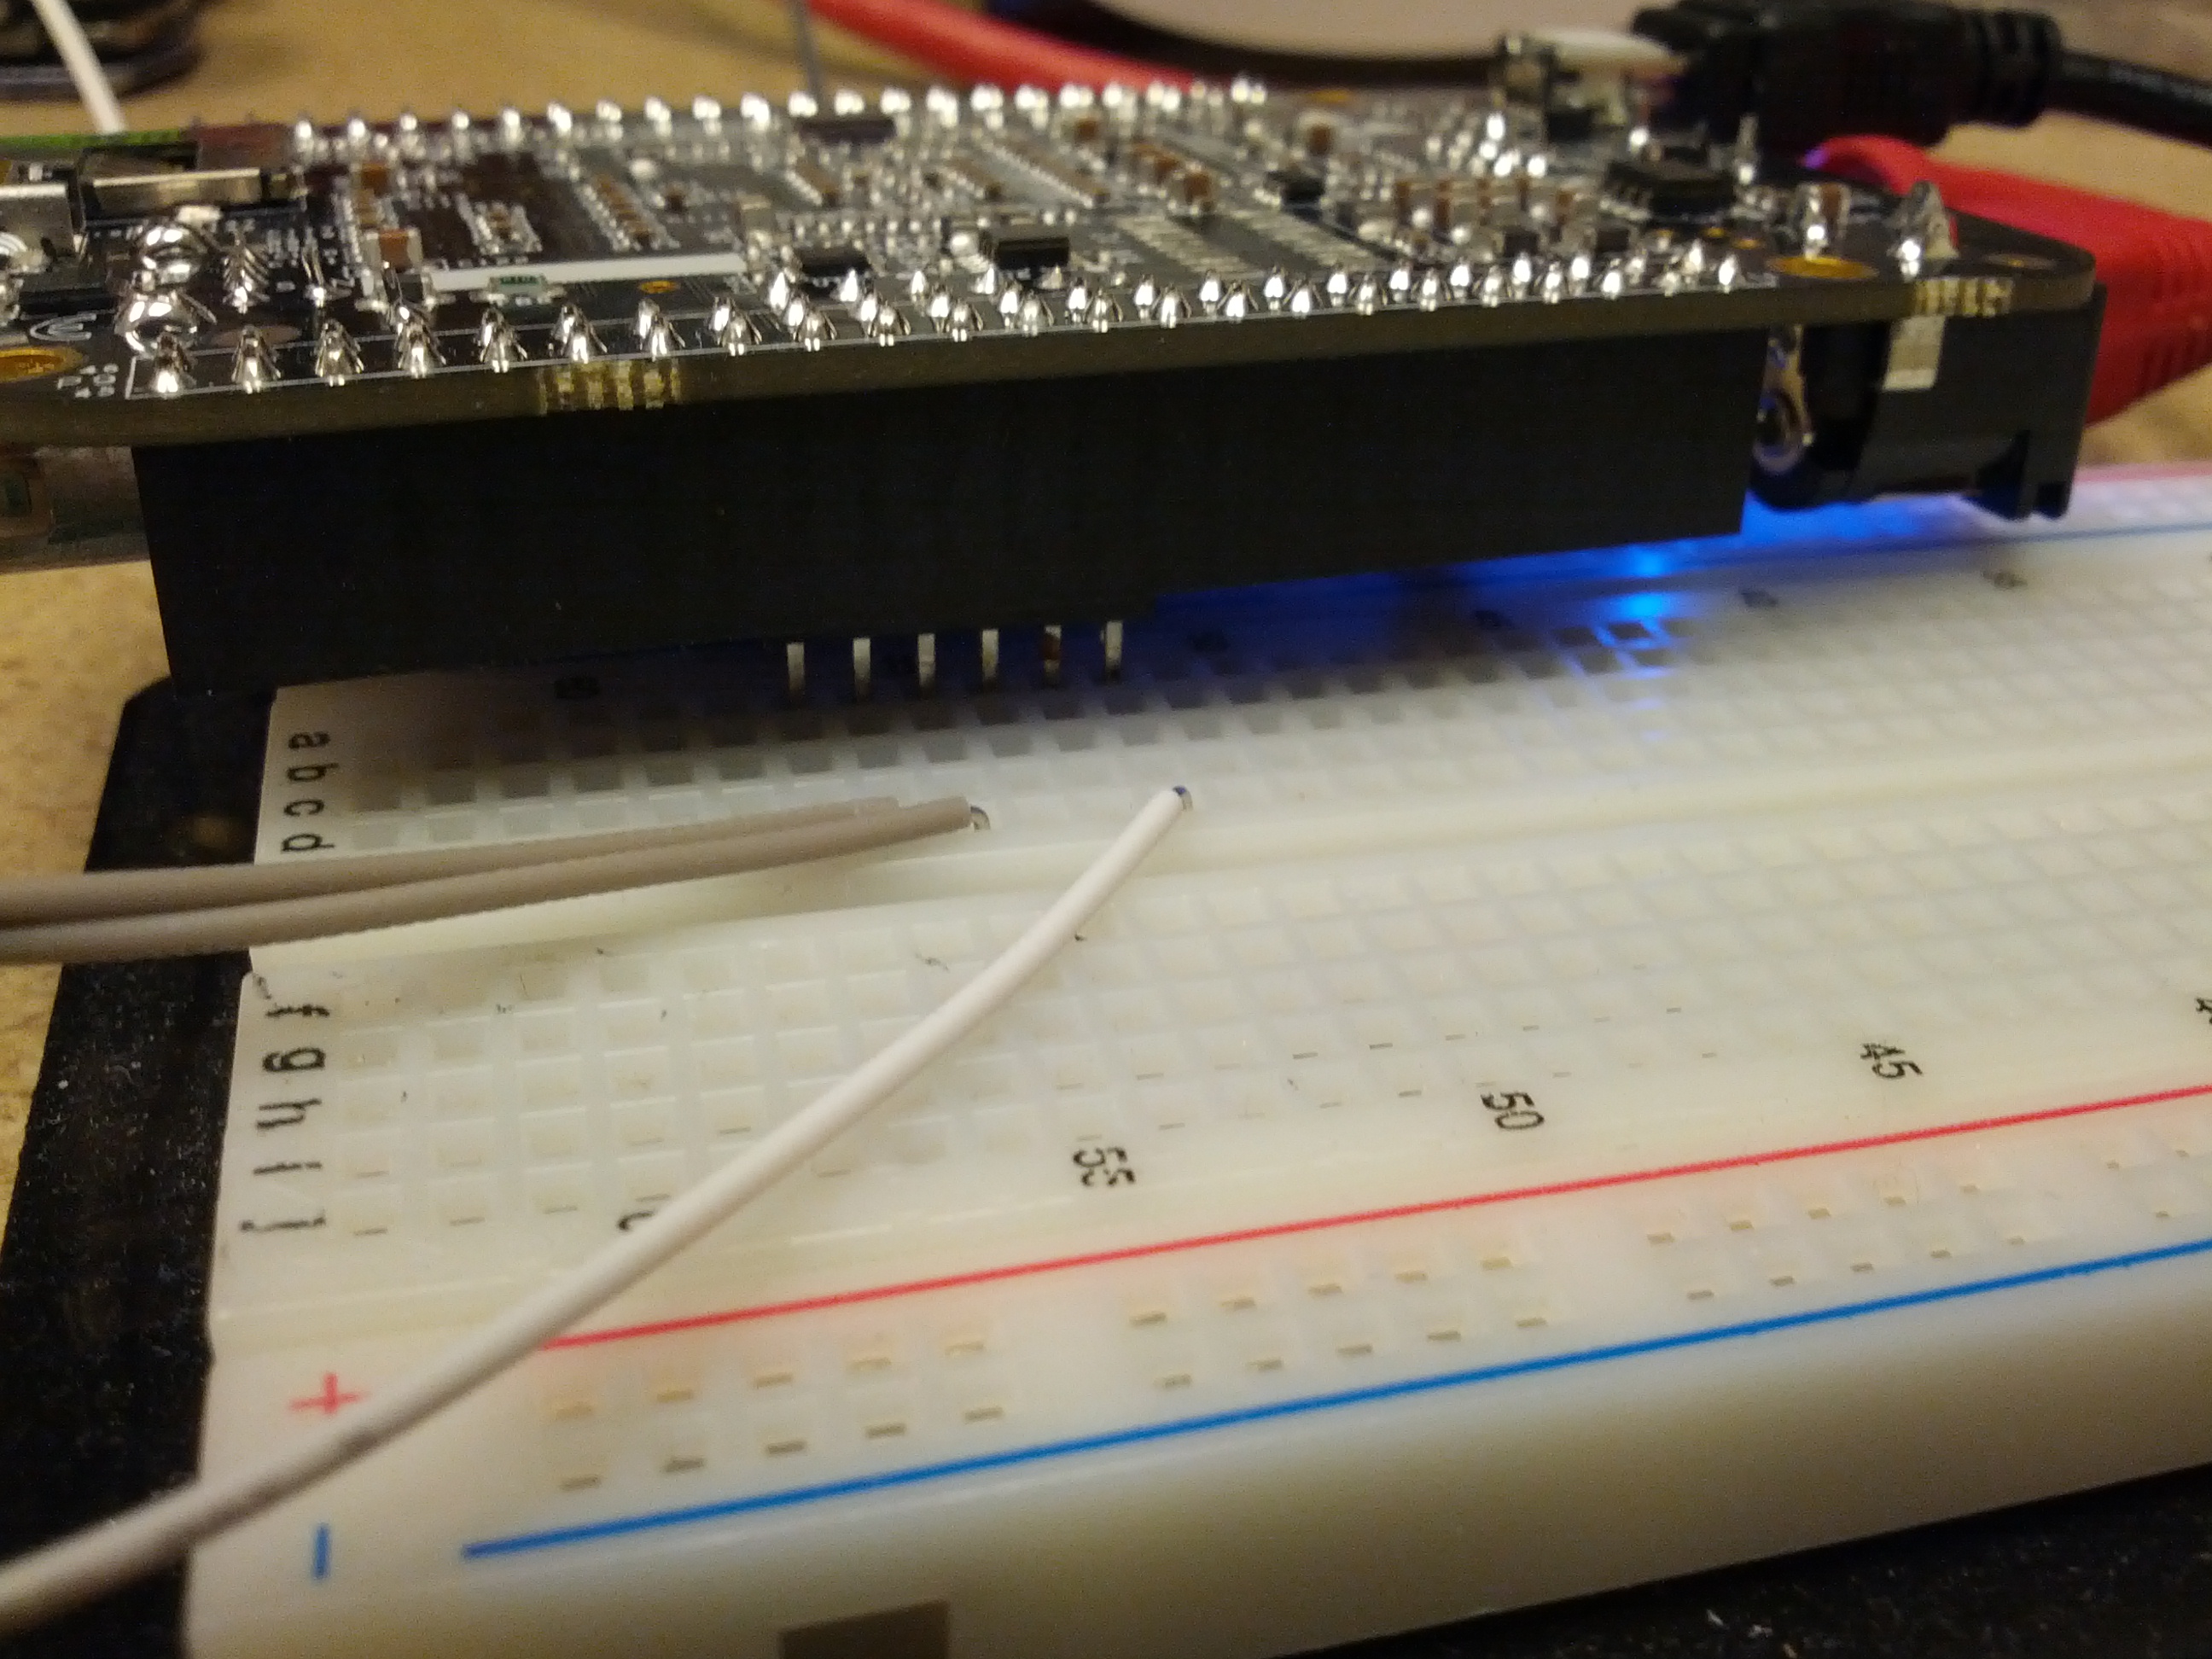
This is the connection between the breadboard and the BBB.