
Blog Archives
Jeff Davis, KE9V did a great post about mailing list etiquette. That was a subject one day this past week on my 2m repeater this past week after a pissing match developed on the HTX-HF_TECH group. I highly recommend reading it. You can find it right here.
-73-

Yeah, this is a week late, but I saw a tweet (above) that jokes about how many resolutions are broken, so I figure I should start late and think about this a bit and ultimately post it a week after New Year’s Day so I can think about this.
This year I want to do the following (in no particular order):
- Use some of the digital modes like PSK
- Activate at least 4 parks in POTA
- Work at least 4 SOTA activations
- Get at least 15% of the way to a DXCC
- Get my WAS
- Work at least 10 special event stations (this may be something like 13 Colonies or Route 66, which sounded like a lot of fun as I heard guys spot them on our local repeater)
- Help with at least 3 volunteer events through CARES (Clermont
- Be more active on the Ham Twit Net and find another net to be active on (not including WARN, although I will be active on WARN)
- Learn CW
- Build a portable multi-band antenna
- Post at least one video per month on using Linux apps in the ham shack
I’m going to look for a goal tracking website/app/something that I can update periodically (monthly, perhaps) and hang on my site. I’ll update this post when I do that.
Think I should include something else? Words of wisdom? Think 15% to DXCC (which for me is 12 more DX stations) is too wussy? Leave me a comment!
-73-
I recently purchased a Heil headset for my old Ten-Tec Omni C. For those that have one, you already know they don’t come with a PTT switch! I’m too cheap and broke to buy one of the nice Heil ones (to go with my used Proset Micro Dual) (not that I think the Heil ones are overpriced – they’re $26 in the latest ham store catalog I received).
So I found a piece of scrap 2×4 and had an extra momentary switch lying around. Sounds like a PTT footswitch to me!
The first part was to drill a few holes – one for the switch and one for the wire out back.


Note: in the second picture, there are two additional holes. Those are from nails or screws in this scrap 2×4’s past life. You can ignore those.
The next part was to feed the wires through. I used a piece of #14 wire to help with this.


Next, obviously was to solder the switch.

Finally, the wires were gently fed back through the hole, tested for continuity (open while the switch was not pressed, and shorted when the switch was pressed) and quickly tested with the radio into a dummy load.
That’s it! Granted, it doesn’t look as polished as some of the manufactured models out there, but since I don’t feel like dropping $26 on a nice footswitch right now, this will do.
-73-
Not long after moving into my house, my 2-year-old Apple Airport WAP “died”. By “died” I mean that I could not connect wirelessly at random times. So I replaced it with a Linksys… which did the same thing. So I replaced it less than a month later with a Netgear. It seemed to work fine for a while, close to a year, and then it did the same thing. However, over time I ran a few network drops and added a radio room in the basement that included a computer. I found that at times the switch still worked but the wireless was out, but some blue LEDs on top were frozen. So I thought the radio was flaky. I went and bought a Linksys WRT-54G, a WAP/Router that I thought would be absolutely bulletproof (and is known throughout the amateur radio community to be a great product). I even decided to stick it to that Murphy guy and bought the extended warranty from Micro Center.
And the same problem happened again. Similar to the Netgear, network access was fine through a wired connection, but unavailable via Wifi. But this time I noticed that I could get wireless back by changing channels.
Not willing to believe that this WAP was dead, I started looking for patterns. The pattern SEEMED (operative word) like it was a cordless phone. So I jacked up the transmit power from the WAP after loading it with DD-WRT. That seemed to work for all of a few hours.
Still with the thought of it being interference from a cordless phone, I took the advice of N8FM via twitter to get a Wifi Spectrum Analyzer. I ordered a Ubiquiti AirView2 spectrum analyzer. After getting it and setting up the software under Fedora Core Linux on my Macbook Pro, this is what I saw:

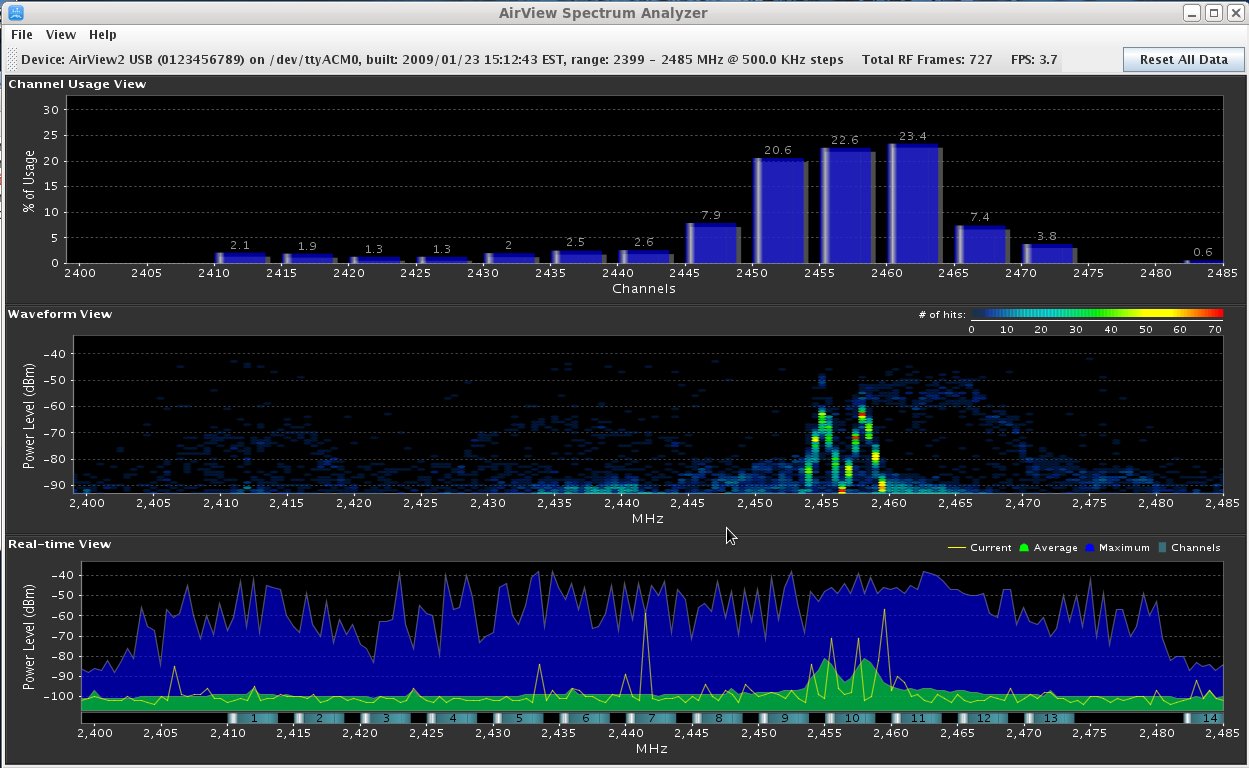

The first thing I noticed was the clearly-defined frequency range. Not a lot of movement there. The second thing I noticed was the strength. These signals were stronger than the WAP that is 30 feet away on a cabinet in the kitchen with NOTHING between the computer and the WAP. If that’s a cordless phone from my neighbors and still that strong through two exterior walls, I’m not going to have neighbors too long! That would be enough 2.5 GHz radiation to cook their brain – microwaves run at 2.5 GHz!
So I too the computer to an upstairs bedroom and still noticed the strong signals, just not so strong.
I returned to the family room to let things monitor, and just happened to notice that I have a Samsung soundbar that has a subwoofer with a wireless connection. I immediately ran upstairs, grabbed the laptop, and brought it downstairs and placed it next to the subwoofer. I unplugged the soundbar and subwoofer and the signals were gone! I plugged the subwoofer back in and observed signals running up the spectrum. I plugged in the soundbar and the signals picked a random location to stop at right in the bandwidth for channel 1, right in the WAP’s channel! Clearly the soundbar doesn’t look before transmitting. It also doesn’t have a channel selection switch or a wired subwoofer option. In fact, from observing the signals on the analyzer, it looks like the soundbar starts checking frequencies going down the spectrum, the subwoofer goes up the spectrum, and where they meet, they stay.
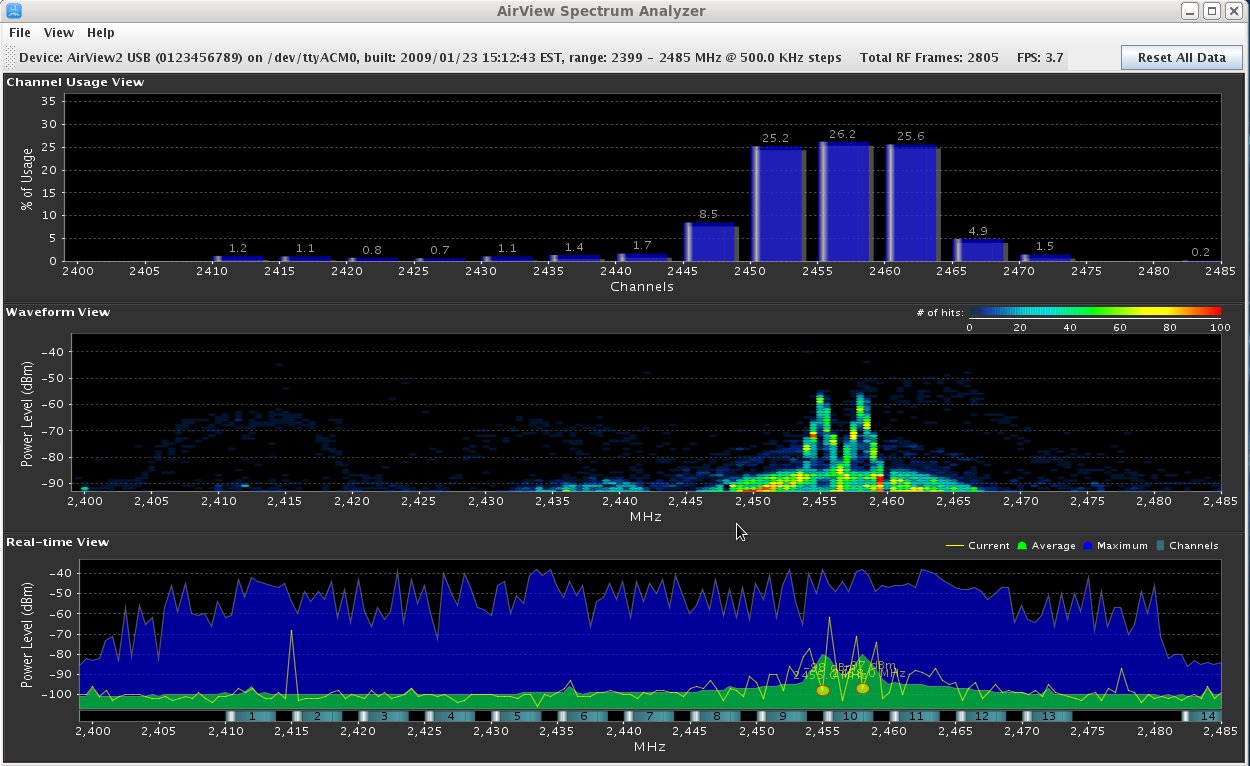
Anyway, after running the spectrum analyzer for a few minutes, it looked like the image below:
(note that it looked like this after running it for several minutes longer, at least 15 minutes) but the screenshot had a box in the middle of it, so this is what it looks like after a few minutes… they look very similar, which is good).
So the moral of the story is that:
- Samsung soundbar (model HT-WS1G) is junk.
- If you really think your neighbors’ cordless telephone (that you don’t really know they have) is interfering with stuff in your house, you’d do well to go through the troubleshooting steps methodically to avoid looking stupid – I’m glad I never mentioned this to my neighbors because it wasn’t them!
- Any source of interference can be found with diligence and good tools.
-73-
A few days ago, I tweeted and posted to Google+ “I’m going to do a blog post on Hamr + Linux. I need to help dispel the myth of “there’s not a lot of hamr software for Linux””. This was started because of a conversation on the local 2m repeater and others making that claim. I typed this knowing full well that there were already resources out there.
There is A LOT of software for amateur radio. It is listed on http://radio.linux.org.au/?sectpat=All&ordpat=title. There’s another list at http://www.dxzone.com/catalog/Software/Linux/. The problems are that some of it isn’t very good, and some aren’t being updated anymore.
So for starters, what distro should you be using? This is really a personal question, and I’m not going to answer it. LeRoy, KD8BXP has done an excellent write up about 19 different Linux distros at http://kd8bxp.blogspot.com/2011/10/follow-up-on-19-different-linux-distros.html. He doesn’t answer that personal question, either, but his blog post will help you answer that question. I use Mint Linux for now. I’ve used and enjoyed Fedora and Ubuntu, but I understand the latest version of Ubuntu has a few issues.
Other resources include Linux in the Ham Shack Podcast (at the time of writing, this hasn’t been updated for a few months) (which just got updated with 3 new shows and they’re doing another as I type!) and Resonant Frequency Podcast.
I will be looking at the following subjects, and probably in this order (or close to it):
- Logging for General Operating
- Digital Modes
- Soundmodem (used for Packet and APRS)
- APRS
- Contest Logging
- Satellite Pass Prediction
- Antenna Analysis
- Propagation Prediction
- Packet
- Software Defined Radio*
- USB Rig Control*
For each of these, I will look into and give a quick evaluation of all up-to-date packages I can find, and then give a recommendation and detailed “how to use”. Starred items are items that require me to get or buy something. Because of that, these may be pushed until I have the items I need or advanced when I get the items (I will update this list as needed).
For now, I bid thee 73s. If you want to influence my order of things above or make sure I mention something (software, etc) or even a concept (like if you really want me to talk about SSTV), feel free to leave it in the comments section below.
-73-
I am working on a Realistic (Radio Shack) HTX-100. I purchased two of these for $45 last May, and was told “one works, one does not”. I joined the HTX-HF_Tech Yahoo group and started looking into things.
The initial problem (but not the ONLY problem) was that there was a lot of static noise from the speaker. This noise was internal to the radio (thanks to a troubleshooting tip I got on Google+ that told me to short the antenna center to shield at the back of the radio).
I started poking around at things, and found that a trimmer resistor was dirty and was causing the static. Combined with the fact that the speaker was desoldered from the board (an oh-so-difficult fix!), I thought maybe I fixed it.
Then I hooked it up to an antenna and checked its ability to receive. Nothing. I could tune stations in on one HTX (and on my Ten-Tec), but not on this one. In fact, I couldn’t tune anything.
One of the things available (not only on the group but also from a few additional websites) is a repair manual, which is really very helpful. I started into the alignment procedure and noticed that in step 3, I was nowhere near the target value of 10.695 Mhz, and was not able to adjust to get anywhere close. So I started looking at the troubleshooting section for the PLL board (where the coil in step 3 was located). A few steps in the process, I checked voltages on one of the ICs and found a handful of them off. I started checking further, and questioned a crystal. I replaced the crystal and found no change. So, I started looking at other things. I checked the voltages on other ICs and found a handful of others that are off. I looked at capacitors, and noticed a few that have tears that seem to indicate that they’ve failed. I replaced one that I happen to have, and it fixed one of the voltages on one of the ICs. Progress! I have a few more to do, but I need to order the parts.

Blown Capacitors on the HTX-100 PLL Board

Main Board of HTX-100

PLL Board of HTX-100
-73-
Last summer, a friend brought me an Astron RS-35 Power Supply to repair. It had been involved in a near-lightning-strike experience that fried the loading coil on an antenna, among other things. The problem was that as soon as the supply was switched on, it would blow the fuse. The only thing that was obvious was that something was causing the SCR crowbar circuit to fire and blow the fuse to save the power supply.
I started out by checking the bridge diodes and filter capacitors. All seemed fine. I checked the pass transistors and those were fine. During a last resort, I removed an electrolytic capacitor and replaced it with another of the same value, but less voltage. My hope was that the voltage on the original capacitor was unnecessary, or that I would have enough time to test a few things before it blew.
Of course, it never happens that way. I had about 15 seconds (not enough time) before letting the magic smoke out of the capacitor. So, since I’m not an electrical engineer, I decided to run a few tests on the blown cap. I noticed that there was no physical damage to the capacitor EXCEPT a small hole in the jacket.
So after staring a little at the schematic (there is an awesome resource on the Repeater Builder website), I decided to remove a capacitor (C6 on the schematic image below). It seemed like a likely possibility, since this was part of the SCR firing circuit (the part I circled in orange highlighter).

Low and behold, it was it! I replaced the part with a new one, and the power supply is done!
-73-
There’s a lot of people that will call themselves geeks, but only a few of us can call ourselves Übergeeks. Even worse, there’s probably a number of people that call themselves Übergeeks that really aren’t. So because of that, I’ve got a few ideas – if you can’t do the stuff below, you may be a geek, but you’re not an Übergeek.
So first off, what is an Übergeek? The Urban Dictionary defines an Übergeek as An Overgeek. A geek who is either extremely geeky, or highly admired by geeks with similar interests. It is sometimes used as a humorous spoof of the German word “ubermensch” (a person with great powers or abilities).”
So, according to me, one who should be admired for their geekiness:
- Knows at least 3 programming languages (and only one is based on BASIC). HTML does not count.
- Has built something cool with a microcontroller (like an Arduino)
- Has fixed someone else’s computer. You never know how to do anything with a computer until someone else screws one up and YOU fix it. Minor upgrades don’t count.
- Is a master on the command line, preferably a Linux/Unix command line; the stock Windows command line doesn’t count, but PowerShell does.
- Have a geek job. Just as much as I don’t trust a mechanic that doesn’t work on cars, I don’t trust a geek that doesn’t have a geek job.
- Have a ham radio license and BUILD SOMETHING. There are some hams that buy everything, and that’s okay for a ham, but if you’re an Übergeek, you’ll build something. Kits count. Antennas count. Wattage doesn’t matter – QRP Transmitters is fine!
- Always explore how things work. Always. If you don’t know how it works, figure it out.
On October 13, 2011, I presented An Introduction to Arduino Microcontrollers to my club, the Milford Amateur Radio Club. Below are links to help get started and other resources. I will be posting the sample projects and code in a separate blog post.
Arduino
Arduino Getting Started Resources
Arduino Getting Started: http://arduino.cc/en/Guide/HomePage
Arduino Language Reference: http://www.arduino.cc/en/Reference/HomePage
Arduino Inventors Guide:
http://www.sparkfun.com/tutorial/AIK/ARDX-EG-SPAR-PRINT-85-REV-10.pdf (print quality)
http://www.sparkfun.com/tutorial/AIK/ARDX-EG-SPAR-WEB-REV10.pdf (screen quality)
Oomlaut – http://www.oomlout.com/a/ (authors of Inventor’s Guide)
Arduino Suppliers
Sparkfun – http://www.sparkfun.com/
Also available in Micro Center Mall – in the Cincinnati (Sharonville) Micro Center, walk into the video games area and keep going straight!
Starter Kit: http://www.sparkfun.com/products/10174
Large Kit: http://www.sparkfun.com/products/10173
Adafruit Industries – http://www.adafruit.com/
Starter Kit: http://www.adafruit.com/products/68
Large Kit: http://www.adafruit.com/products/170
Arduino Ham Radio Projects
Trackuino APRS Arduino Open Source Code – http://code.google.com/p/trackuino/
Satellite Doppler Effect Rig Tuner – http://youtu.be/TP_fq_frqKw
Morse Code Keyboard – Gone off the net (was at http://gorsat.wordpress.com/2009/03/17/first-arduino-project-morse-code-keyboard/)
More Morse Code with Arduino – http://kb3vcq.posterous.com/arduino-morse
Microcontrolled Ham Radio – http://www.youtube.com/watch?v=0bca4yNgysw
Arduino AM Transmitter – http://dangerousprototypes.com/2011/10/05/am-sofware-radio-using-arduino/
WSPR Beacon – http://ko7m.blogspot.com/2011/03/wspr-beacon-with-arduino-and-dds-60.html
Arduino Antenna Tuner Controller – http://www.n3ox.net/projects/servo/
Other Noteworthy Projects
Other Cool Stuff and Blogs
Nuts & Volts – http://www.nutsvolts.com/
Hack A Day – http://hackaday.com/
Arduino Blog – http://arduino.cc/blog/
bildr Blog – http://bildr.org/
Tools
Google Code – http://code.google.com/ – code hosting – free for open source
GitHub – https://github.com/ – code hosting – free for open source
Example Sketches
Example #1: Blinking LED

#define LEDPIN 11
#define LSPIN 5

void setup()
{
  pinMode(LEDPIN, OUTPUT);
}

void loop()
{
  int lightlevel=analogRead(LSPIN);
  Serial.println(lightlevel);
  digitalWrite(LEDPIN,HIGH);
  delay(lightlevel);
  digitalWrite(LEDPIN,LOW);
  delay(lightlevel);
}
Example 2: Temperature and Humidity on LCD

#include
#include

// Data wire is plugged into port 7 on the Arduino
// Connect a 4.7K resistor between VCC and the data pin (strong pullup)
#define DHT22_PIN 7

// Setup a DHT22 instance
DHT22 myDHT22(DHT22_PIN);

LiquidCrystal lcd(12,11,5,4,3,2);

void setup()
{
  lcd.begin(16,2);
  lcd.clear();
  lcd.print("Starting...");
  delay(2000);
  //Serial.begin(9600);
}

void loop()
{
  DHT22_ERROR_t errorCode;
  errorCode = myDHT22.readData();
  float tempC=0,tempF=0;
  lcd.clear();
  delay(100);
  switch(errorCode)
  {
    case DHT_ERROR_NONE:
      tempC=myDHT22.getTemperatureC();
      tempF=1.8*tempC+32;
      lcd.setCursor(0,0);
      lcd.print("Temp: ");
      lcd.print(tempF);
      lcd.print("F");
      lcd.setCursor(0,1);
      lcd.print("Humidity: ");
      lcd.print(myDHT22.getHumidity());
      lcd.print("%");
      break;
    case DHT_ERROR_CHECKSUM:
            Serial.print(myDHT22.getTemperatureC());
      lcd.setCursor(0,0);
      lcd.print("Temp: ");
      lcd.print(myDHT22.getTemperatureC());
      lcd.print("C CSUM ERR");
      lcd.setCursor(0,1);
      lcd.print("Humidity: ");
      lcd.print(myDHT22.getHumidity());
      lcd.print("%");
      break;
    case DHT_BUS_HUNG:
      lcd.setCursor(0,0);
      lcd.print("BUS Hung");
      break;
    case DHT_ERROR_NOT_PRESENT:
      lcd.setCursor(0,0);
      lcd.print("Not Present");
      break;
    case DHT_ERROR_ACK_TOO_LONG:
      lcd.setCursor(0,0);
      lcd.print("ACK time out");
      break;
    case DHT_ERROR_SYNC_TIMEOUT:
      lcd.setCursor(0,0);
      lcd.print("Sync Timeout");
      break;
    case DHT_ERROR_DATA_TIMEOUT:
      lcd.setCursor(0,0);
      lcd.print("Data Timeout");
      break;
    case DHT_ERROR_TOOQUICK:
      lcd.setCursor(0,0);
      lcd.print("Polled too quick");
      break;
  }
  delay(5000);
}